
A roof isn’t just shingles. It’s a layered system: wood decking, waterproof membranes, underlayment, metal flashing and finally the roofing itself, with every layer lapped over the one below it so water always runs down and out.
Most leaks don’t start in the open field of shingles. They start where the roof is interrupted, at a chimney, a wall, a valley, a pipe or a skylight. That is where the parts in this guide do their work.
Each section below explains one part the way we would on a roof inspection: what it is, where it goes, what it’s made of, how it should be installed and what goes wrong when it isn’t. Code references are to the International Residential Code (IRC), the model code that Pennsylvania, New Jersey and Delaware build their residential codes on. Your town’s adopted edition and local amendments always govern. Looking for siding? See the companion guide, Parts of Siding, Explained.
Key takeaways
- Most roof leaks start at flashing (chimneys, walls, valleys, pipes and skylights), not in the open field of shingles.
- Flashing works in pairs: step or base flashing moves with the roof, and counter flashing on the wall covers its top edge.
- The IRC requires a cricket behind any chimney more than 30 inches wide.
- Ice and water shield goes where water collects or backs up; underlayment (felt or synthetic) covers the rest of the deck.
- Every roof type needs its own underlayment: high-temperature membranes under metal, felt interlayment on cedar shakes, and heavy underlayment under tile.
- On a full replacement, Shelby Roofing Services tears off to the deck and installs all new flashing (copper is our standard), pipe boots and vents. Nothing is reused.
Quick Reference
| Part | What it is | Purpose |
|---|---|---|
| Chimney flashing | Chimney flashing is the set of metal pieces that seals the gap where a masonry chimney passes through the roof. | Keeps rain out of the gap where the chimney passes through the roof, one of the most leak-prone openings on any roof. |
| Chimney cricket (saddle) | A chimney cricket (also called a saddle) is a small peaked ridge built on the uphill side of a chimney. | Keeps water, snow and leaves from piling up behind a wide chimney by sending them around both sides of it. |
| Counter flashing | Counter flashing is the upper layer of metal that covers the top edge of base and step flashing. | Covers the top edge of the base and step flashing so water running down a chimney or wall can’t get behind it, while letting the roof and the masonry move separately. |
| Step flashing | Step flashing is a series of small L-shaped metal pieces installed one per shingle course where a sloped roof runs along a vertical wall or the side of a chimney. | Seals the joint where a roof runs along a wall, one shingle course at a time, so water is always shed back onto the roof. |
| Headwall (apron) flashing | Headwall flashing (also called apron flashing) is a continuous strip of metal that seals the joint where the top edge of a roof meets a wall, such as where a porch roof, bay window roof or lower roof runs into the house wall above it. | Seals the joint where the top of a roof meets a wall, so water running down the wall lands on top of the roof instead of behind it. |
| Kick-out flashing | Kick-out flashing (also called a diverter) is a small angled piece of metal at the bottom of a roof-to-wall joint. | Turns the water collected along a roof-to-wall joint into the gutter, so it can’t pour behind the siding or stucco. |
| Pipe boots | A pipe boot is the flashing that seals around a plumbing vent pipe where it comes up through the roof. | Keeps rain from running down the outside of a plumbing vent pipe into the attic, while the pipe vents sewer gases out of the house and lets the drains flow. |
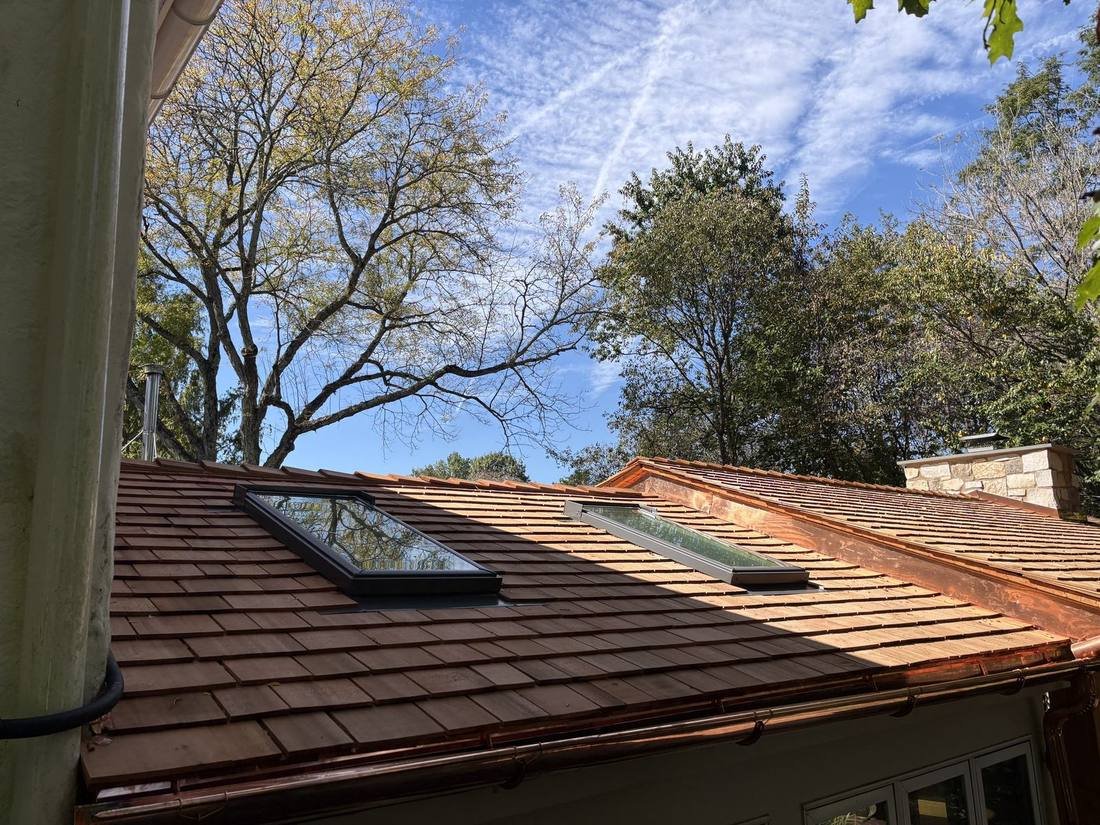
| Skylight flashing | Skylight flashing is the matched kit of sill, side (step) and head flashing pieces, made by the skylight manufacturer, that seals a skylight frame into the roof. | Seals the skylight frame into the roof so rain runs around the skylight instead of into the opening. |
| Valleys: open, closed, woven & W | A roof valley is the inward-angled seam where two roof slopes meet. | Carries the water from two roof slopes down to the gutter without letting it get under the roofing. |
| Decking (sheathing) | Roof decking (also called sheathing) is the layer of plywood, OSB or wood boards fastened to the rafters. | Gives every other layer of the roof a solid surface to nail into and carries the roof’s weight to the rafters. |
| Drip edge | Drip edge is an L- or T-shaped metal strip installed along the eaves and rakes (the bottom and sloped side edges) of a roof. | Guides water off the roof edge into the gutter and protects the fascia and the edge of the deck from rot. |
| Fascia board | A fascia board is the long, flat board that runs along the roof edge across the ends of the rafters. | Closes off the ends of the rafters, holds the gutters and backs the drip edge along the roof edge. |
| Ice & water shield | Ice and water shield is a self-adhering, rubberized-asphalt membrane applied directly to the roof deck in the areas most likely to leak. | Seals the deck where water is most likely to back up or collect, so ice dams and wind-driven rain can’t reach the wood. |
| Underlayment: felt vs. synthetic | Roof underlayment is the water-resistant sheet that covers the entire roof deck under the shingles. | Adds a second water-shedding layer under the shingles across the whole roof deck. |
| Starter strip | A starter strip is the first course of adhesive-backed shingles installed along the eaves and rakes before the main shingles. | Seals the roof edges so wind can’t lift the first row of shingles, and covers the gaps in that row. |
| Ridge cap | Ridge cap shingles are the thicker, pre-bent shingles that cover the peak of the roof (the ridge) and the outside corners where two slopes meet (the hips). | Seals and finishes the peaks and hips, the most wind-exposed points of the roof. |
| Ridge vents & ventilation | Roof ventilation is the balanced intake-and-exhaust system that lets outside air enter low at the soffits and leave high at the ridge. | Keeps the attic dry and close to the outdoor temperature, which protects the shingles and deck and helps prevent ice dams. |
Part 1 · Flashing
Flashing is the formed metal that seals every joint where the roof meets something else: a chimney, a wall, a pipe or a skylight. It’s where most roof leaks begin.
Chimney Flashing
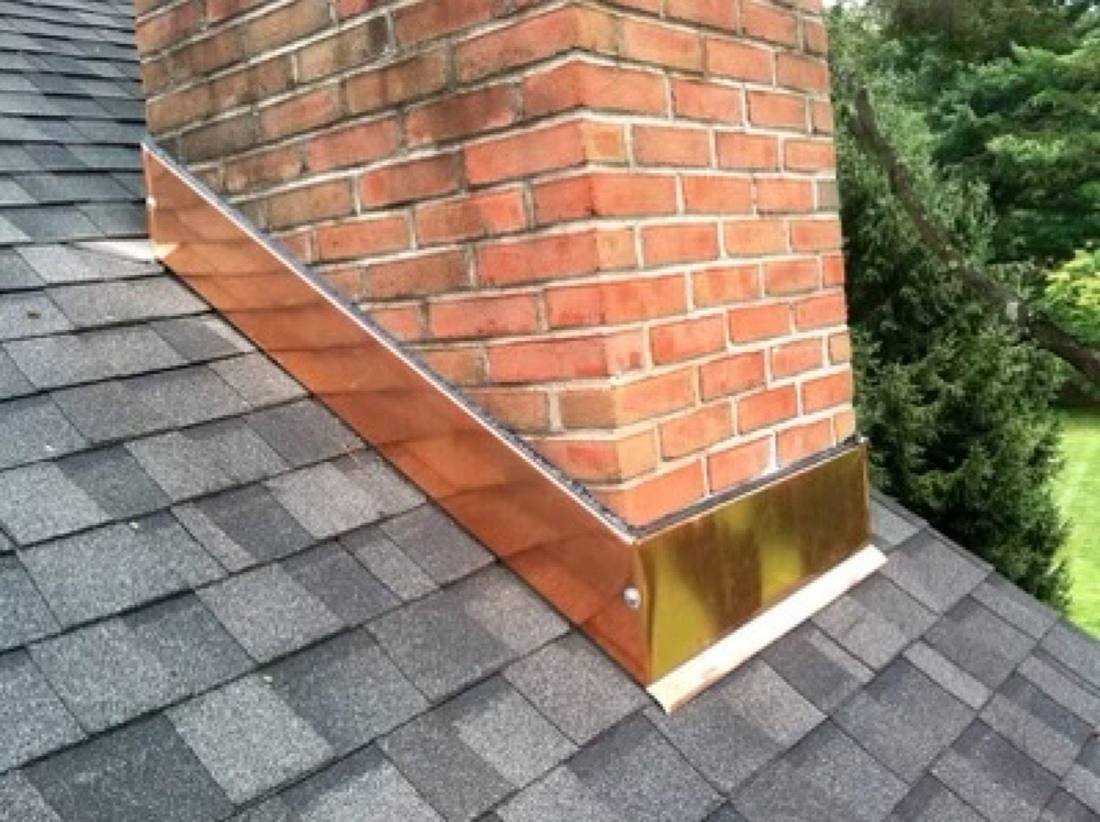
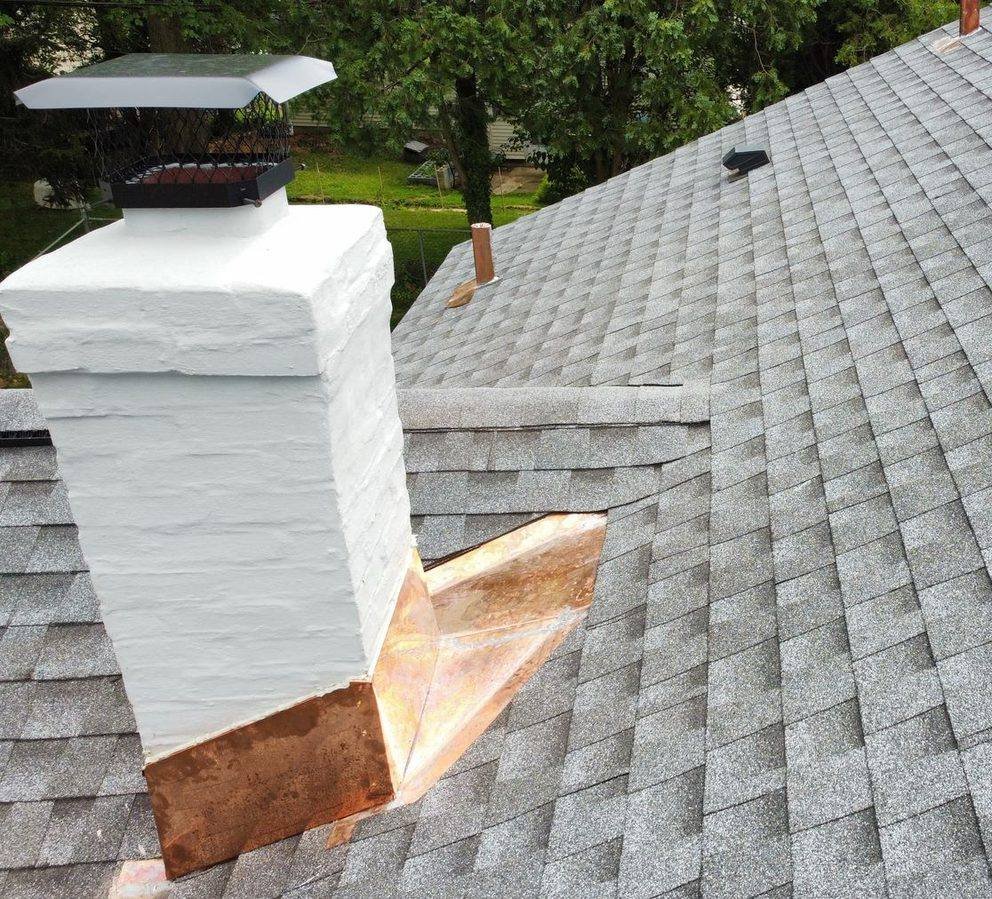
Also called: chimney flashing kit, base and counter flashingChimney flashing is the set of metal pieces that seals the gap where a masonry chimney passes through the roof. It is a system, not one part: an apron across the front, step flashing up both sides, a back pan or cricket on the uphill side, and counter flashing set into the brick over all of it.
PurposeKeeps rain out of the gap where the chimney passes through the roof, one of the most leak-prone openings on any roof.
- Where it goes
- Around all four sides of the chimney, where the brick or stucco meets the roof deck and shingles.
- Materials
- Copper, lead-coated copper, stainless steel and painted or galvanized steel. Aluminum is common elsewhere on a roof, but it is a poor choice where metal is set into mortar, because wet mortar is alkaline and corrodes it.
- Why it matters
- Brick, mortar and the roof move at different rates. Two-piece flashing lets them move without opening a gap, which is why caulk alone always fails at a chimney.
- Code
- The IRC requires flashing at every roof-and-wall intersection and roof opening (R903.2.1), and a cricket behind wide chimneys (R903.2.2).
How it’s installed
- Shingles are run up to the front of the chimney and the apron (front base flashing) is set over them and bent up the face of the brick.
- Step flashing is woven up each side, one piece per shingle course (see step flashing).
- A back pan or a framed cricket is installed on the uphill side, tucked under the shingles above it so water runs over it, never behind it.
- Counter flashing is let into the mortar joints and folded down over the top edges of all the base pieces (see counter flashing).
- Corners are folded or soldered so there are no open seams at the four corners of the chimney.
What goes wrong
- Flashing that is only caulked or tarred to the face of the brick. Sealant dries out and lets go within a few seasons.
- One long bent strip up the side instead of individual step pieces.
- No cricket on a wide chimney, so water, leaves and ice pile up behind it.
- Old, rusted flashing reused under a new roof.
On a full replacement, our crews remove all of the old flashing and install new chimney flashing. Nothing is reused. Copper is our standard flashing metal, with step flashing, soldered corners and counter flashing cut into the chimney’s mortar joints, like the chimneys shown here. We build these to last because when a roof system starts to fail, it is usually at the chimney flashing and the rubber pipe boots.
Chimney Cricket
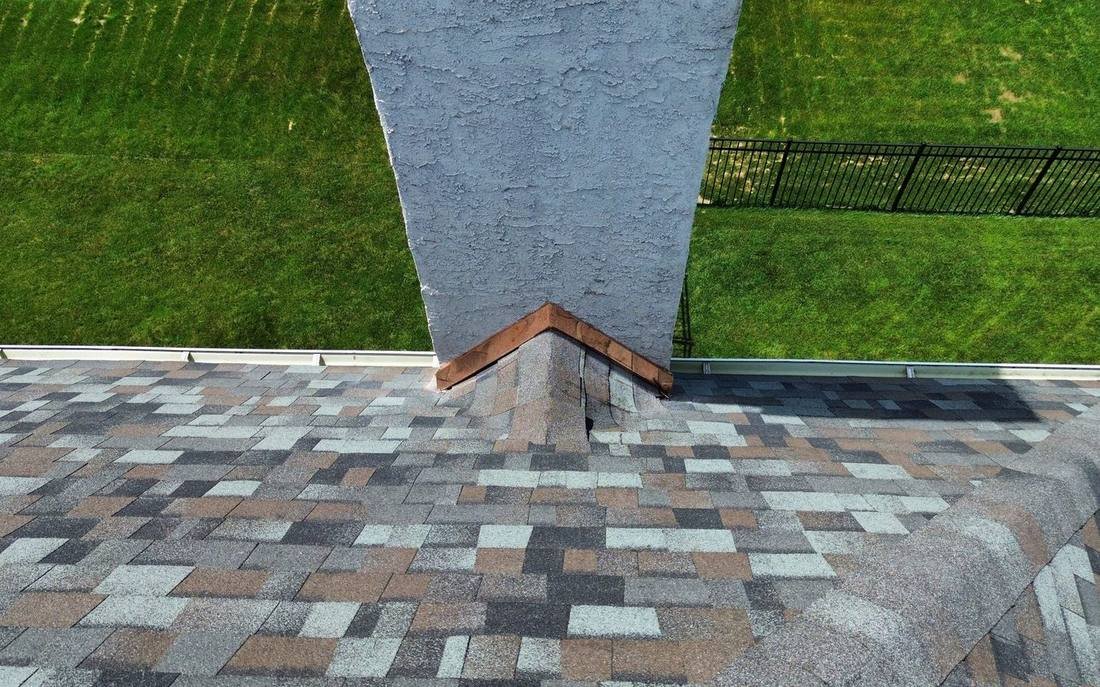
Also called: saddle, chimney saddleA chimney cricket (also called a saddle) is a small peaked ridge built on the uphill side of a chimney. It splits the water, snow and leaves coming down the roof and sends them around both sides of the chimney instead of letting them pile up against the brick.
PurposeKeeps water, snow and leaves from piling up behind a wide chimney by sending them around both sides of it.
- Where it goes
- Behind the chimney, on the side that faces the ridge. Chimneys that sit right on the ridge do not need one.
- When it’s required
- IRC R903.2.2 requires a cricket or saddle on the ridge side of any chimney or penetration more than 30 inches wide, measured across the slope.
- How it’s built
- Usually framed in wood on the roof deck and sheathed, then covered with a waterproof membrane and either sheet metal or shingles. Small crickets can be formed entirely from metal.
- Materials
- Copper, painted or galvanized steel, or shingles over ice and water shield to match the roof.
How tall should a cricket be?
For masonry chimneys, IRC Table R1003.20 sets the cricket’s height as a share of the chimney’s width, based on how steep the roof is. The steeper the roof, the taller the cricket.
| Roof slope | Cricket height (H) | Example: 48-inch-wide chimney |
|---|---|---|
| 12:12 | 1/2 of the chimney width | 24 inches |
| 8:12 | 1/3 of the chimney width | 16 inches |
| 6:12 | 1/4 of the chimney width | 12 inches |
| 4:12 | 1/6 of the chimney width | 8 inches |
| 3:12 | 1/8 of the chimney width | 6 inches |
Source: IRC Table R1003.20, chimney crickets. Your town’s adopted code edition governs.
What goes wrong
- No cricket at all on a chimney wider than 30 inches. This is the most common cause of leaks at the back of a chimney.
- A cricket that is too flat to shed water, so it holds puddles and debris.
- Shingles laid over the cricket without a membrane underneath, or without counter flashing where it meets the brick.
Shelby Roofing Services builds crickets where the code requires them: on the uphill side of a chimney more than 30 inches wide. Each one is flashed and counter-flashed into the chimney like the rest of the chimney flashing, as in the Plymouth Township project shown above.
Counter Flashing
Also called: cap flashing, counterflashingCounter flashing is the upper layer of metal that covers the top edge of base and step flashing. It is attached to the wall or chimney, and it laps down over the flashing below so water running down the masonry is shed onto the roof instead of getting behind it.
PurposeCovers the top edge of the base and step flashing so water running down a chimney or wall can’t get behind it, while letting the roof and the masonry move separately.
- How it works
- Base flashing is fastened to the roof; counter flashing is fastened to the wall. They overlap but are not fastened to each other, so the roof and the masonry can move separately without tearing the seal.
- On brick or stone
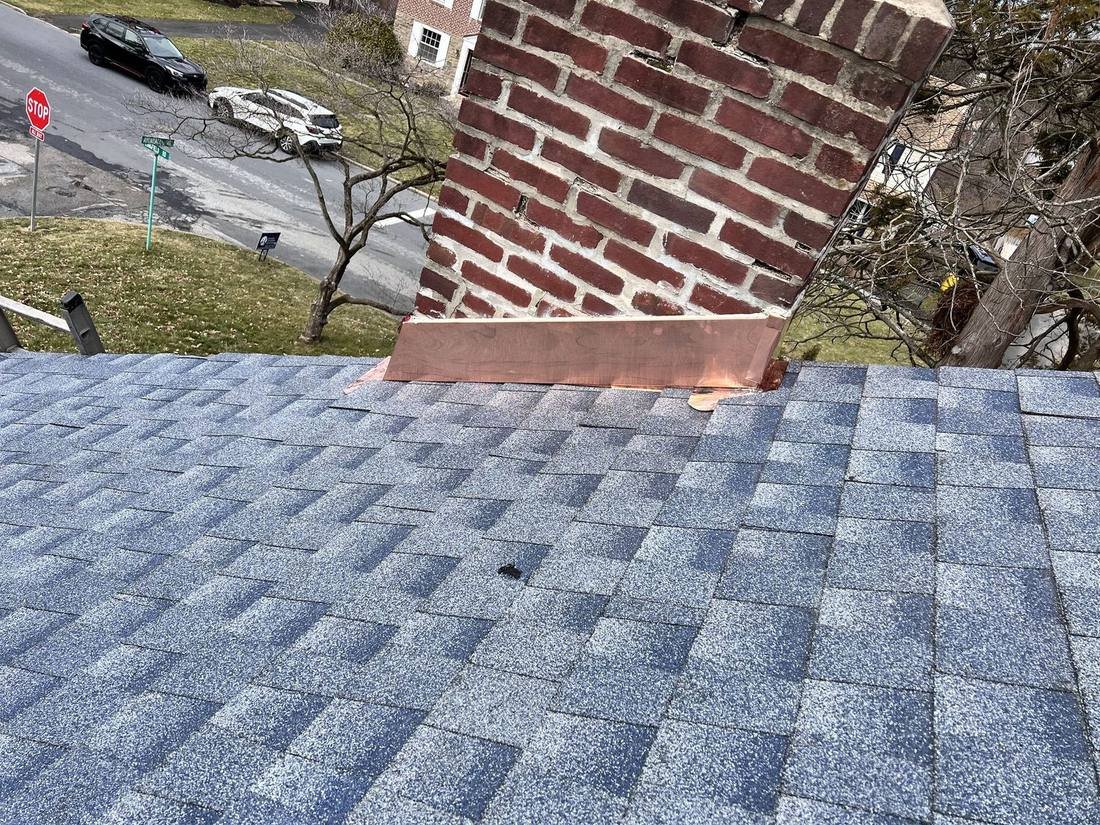
- The best practice is a reglet: a groove cut into a mortar joint. The top edge of the metal is bent into the groove, wedged and sealed. On the sloped sides it is stepped to follow the mortar courses.
- Surface-mounted
- Some counter flashing is fastened to the face of the masonry with a termination bar and sealant. It works, but it depends on sealant and needs more upkeep than a reglet.
- On siding walls
- On a framed wall, the house wrap and siding do the job of counter flashing: they lap over the vertical leg of the step flashing (IRC R905.2.8.3).
What goes wrong
- Counter flashing nailed through the base flashing, which locks the two together so they tear as the house moves.
- A shallow cut in the mortar that lets the metal pull out.
- Caulk smeared over the top edge as the only seal.
On chimneys, our crews cut the counter flashing into the mortar joints instead of caulking it to the face of the brick, and fold it down over the base and step flashing. It is copper, our standard flashing metal; the chimneys on this page show stepped counter flashing let into the brick.
Step Flashing
Also called: sidewall flashing, step shinglesStep flashing is a series of small L-shaped metal pieces installed one per shingle course where a sloped roof runs along a vertical wall or the side of a chimney. Each piece laps over the one below it, so water is always shed onto the next shingle down.
PurposeSeals the joint where a roof runs along a wall, one shingle course at a time, so water is always shed back onto the roof.
- Where it goes
- Along every place where a roof slope runs beside a wall: dormer sides, a lower roof against a two-story wall, and both sides of a chimney.
- Code minimum
- IRC R905.2.8.3: base flashing against a vertical sidewall must be continuous or step flashing, at least 4 inches high and 4 inches wide, and must direct water onto the roof or into the gutter.
- Materials
- Prefinished or mill aluminum, galvanized or painted steel, and copper. Copper is used against masonry and on copper-detailed roofs.
- Partner part
- Step flashing always needs a cover: counter flashing on masonry, or house wrap and siding on a framed wall.
How it’s installed
- Each piece is set just above the shingle it sits on, with one leg on the roof and one leg up the wall.
- The next shingle covers the roof leg, and the next piece of step flashing laps over the one below.
- Pieces are nailed to the roof deck only, high on the roof leg, never to the wall, so the roof and wall can move independently.
- The house wrap and siding (or the counter flashing on masonry) come down over the wall leg.
- The first piece at the bottom of the wall is a kick-out, so the water collected by the step flashing is turned into the gutter.
What goes wrong
- One long continuous strip on a shingle roof, so water that gets under one shingle can run behind the whole joint.
- Old step flashing left in place behind the siding during a re-roof.
- Siding installed tight to the shingles, which wicks water up behind the flashing.
On a full replacement, all new flashing is installed at walls and roof transitions, including new step flashing, in copper, our standard flashing metal. Nothing is reused.
Headwall Flashing
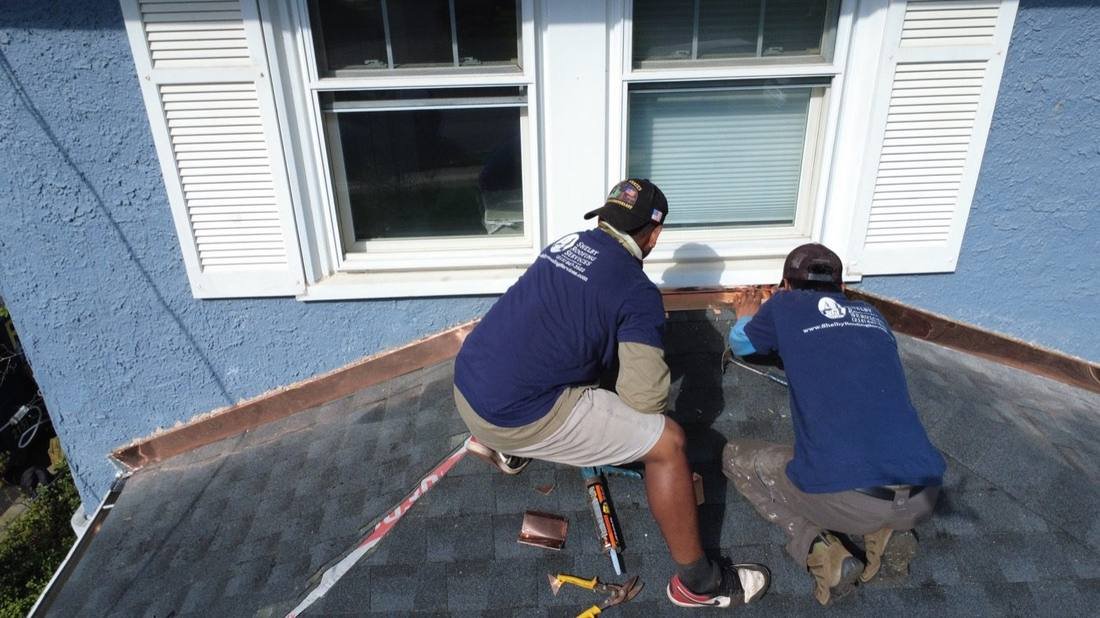
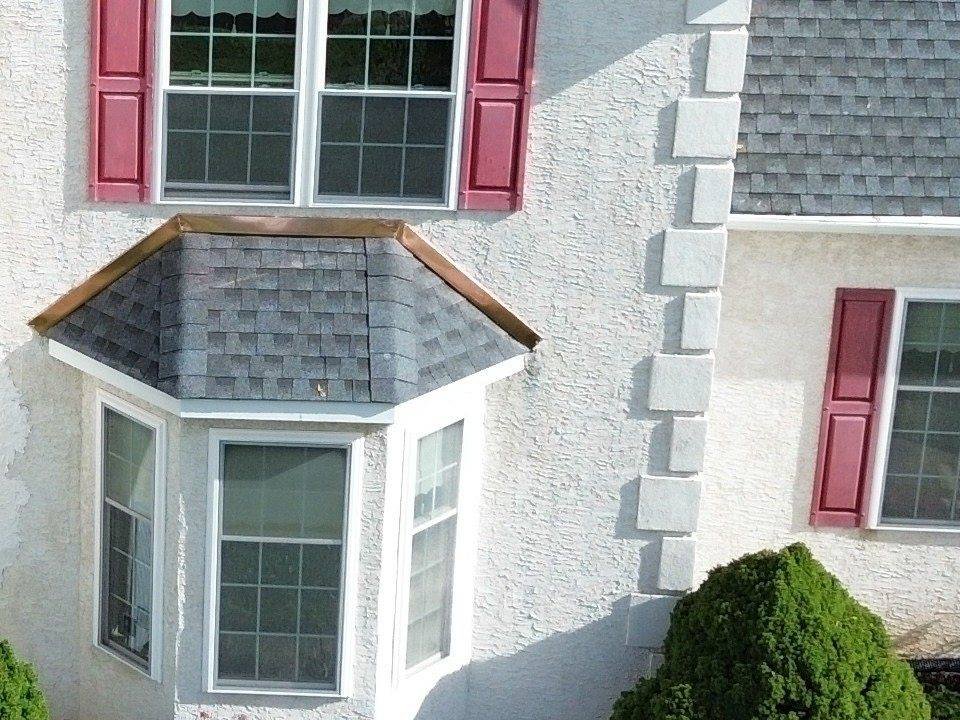
Also called: apron flashing, front wall flashingHeadwall flashing (also called apron flashing) is a continuous strip of metal that seals the joint where the top edge of a roof meets a wall, such as where a porch roof, bay window roof or lower roof runs into the house wall above it.
PurposeSeals the joint where the top of a roof meets a wall, so water running down the wall lands on top of the roof instead of behind it.
- Where it goes
- Along the horizontal line where the top of a roof slope meets a wall: porch roofs, bay windows, shed dormers and the front of a chimney.
- How it’s shaped
- One leg lies over the top course of shingles; the other leg runs up the wall, behind the house wrap and siding or under counter flashing. The bottom edge is often hemmed for stiffness.
- Materials
- Aluminum, painted or galvanized steel, or copper.
- Ends
- Where the headwall meets a sidewall, the flashing turns the corner and ties into the step flashing and kick-out.
What goes wrong
- A bead of caulk at the wall line instead of real flashing.
- Flashing installed on top of the house wrap instead of behind it, so water running down the wall gets behind the metal.
- Corners left open where the headwall meets a sidewall.
Walls and roof transitions get all new flashing on a full replacement. Copper is our standard flashing metal, so headwall flashing is formed in copper, like the bay window and porch details shown here.
Kick-Out Flashing
Also called: kickout, diverter flashingKick-out flashing (also called a diverter) is a small angled piece of metal at the bottom of a roof-to-wall joint. It turns the water running down the step flashing out and away from the wall, into the gutter, instead of letting it pour behind the siding.
PurposeTurns the water collected along a roof-to-wall joint into the gutter, so it can’t pour behind the siding or stucco.
- Where it goes
- At every spot where a roof edge stops against a wall that keeps going down past it, such as the bottom of a dormer side or where a garage roof meets a two-story wall.
- Code
- IRC R903.2.1 requires flashing that diverts water away where the eave of a sloped roof meets a vertical sidewall. Metal flashing must be corrosion resistant and at least 0.019 inch thick (No. 26 galvanized sheet).
- Materials
- Pre-formed aluminum or plastic kick-outs, or soldered copper on copper-flashed roofs.
- Why it matters
- It is a small part, but missing kick-outs are one of the details most often linked to hidden rot behind siding and stucco right below a roof edge.
How it’s installed
- The kick-out is installed first, at the eave, before the first piece of step flashing.
- Its wall leg goes behind the house wrap; the step flashing laps over it.
- The angled “kick” sits over the gutter so the water lands in the gutter, not on the wall.
What goes wrong
- No kick-out, so water runs behind the siding at the bottom of the roofline.
- A kick-out installed over the house wrap instead of behind it.
- A gutter that stops short of the wall, so the kick-out has nowhere to send the water.
Shelby Roofing Services installs a kick-out wherever a roof edge ends against a wall that keeps going below it. If you see water stains, peeling paint or soft siding just below a roof edge on your home, ask us to check for one during a free inspection.
Pipe Boots
Also called: pipe flashing, plumbing vent flashing, vent stack bootA pipe boot is the flashing that seals around a plumbing vent pipe where it comes up through the roof. Its flat base is woven into the shingles and its collar fits snugly around the pipe.
PurposeKeeps rain from running down the outside of a plumbing vent pipe into the attic, while the pipe vents sewer gases out of the house and lets the drains flow.
- Rubber (neoprene/EPDM)
- The most common type: a rubber collar on a metal or plastic base. The rubber is exposed to sun and weather and often cracks or splits years before the shingles wear out.
- Lead
- A soft lead sleeve that is folded down into the top of the pipe. Long-lasting, but it can be chewed by squirrels.
- Copper
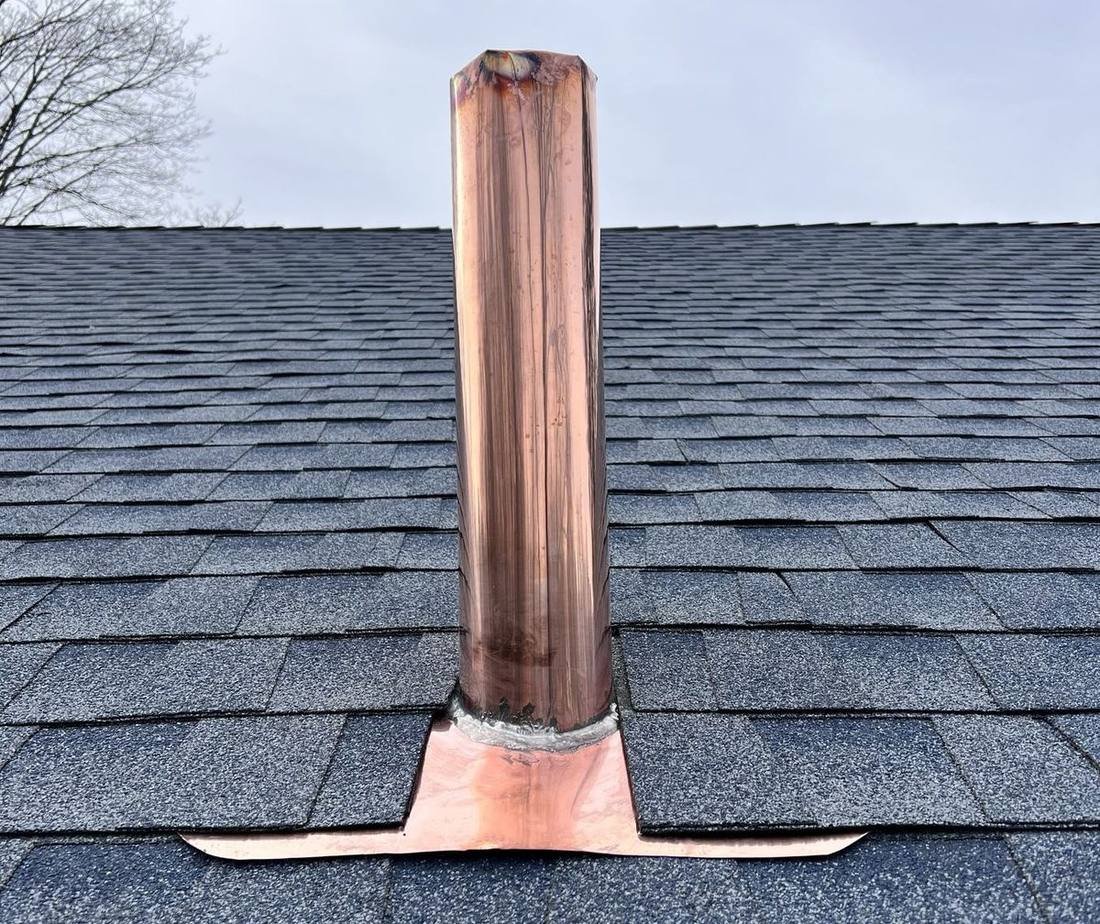
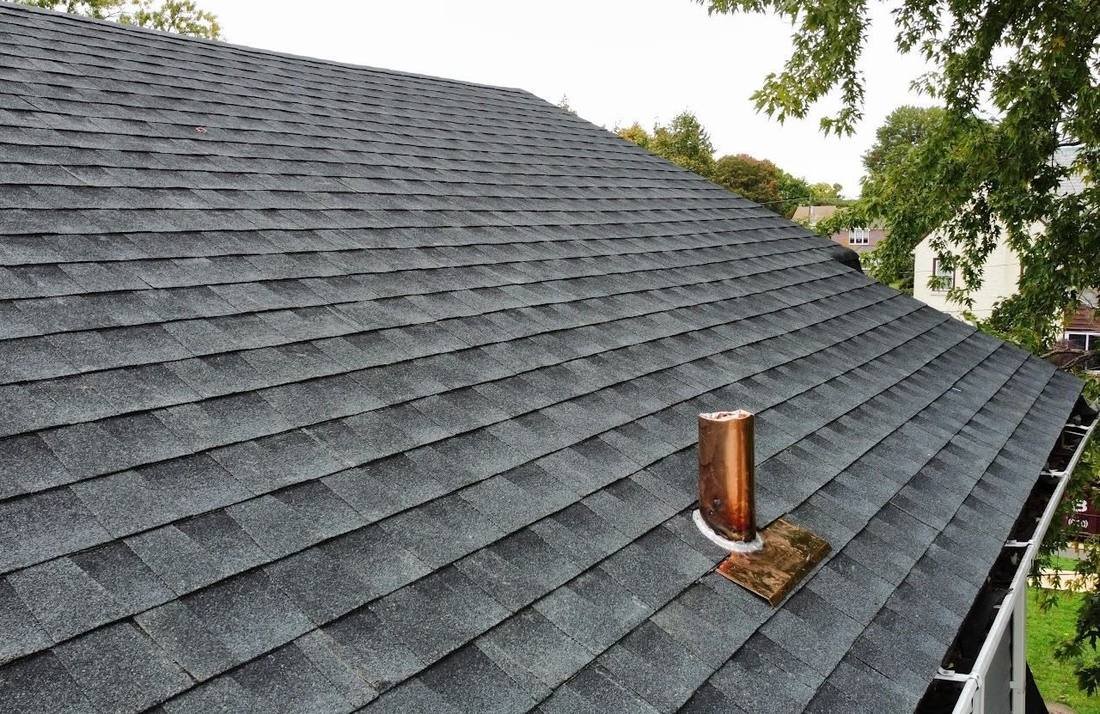
- A formed and soldered copper sleeve and base. Very long-lasting and a natural match for copper flashing details.
- Where it goes
- Every plumbing vent stack on the roof. Exhaust vents and other penetrations get their own matched flashing.
How it’s installed
- The lower half of the base sits on top of the shingles below the pipe.
- The upper half of the base and the sides go under the shingles above, so water runs over the flashing.
- Nails are placed where the next course of shingles covers them, and the collar is seated tight around the pipe.
What goes wrong
- A cracked rubber collar, the most common pipe leak.
- The base installed on top of the shingles all the way around, so water runs under it from above.
- Exposed nail heads or a thick layer of sealant used instead of proper lapping.
Every full replacement gets new pipe boots and penetration flashings; old rubber boots are never reused. Copper is our standard pipe flashing, like the two shown here, because cracked rubber pipe boots are one of the first places a roof system starts to fail.
Skylight Flashing
Also called: skylight flashing kitSkylight flashing is the matched kit of sill, side (step) and head flashing pieces, made by the skylight manufacturer, that seals a skylight frame into the roof.
PurposeSeals the skylight frame into the roof so rain runs around the skylight instead of into the opening.
- Why a kit
- Each skylight model is designed with its own flashing kit, and the right kit depends on the roofing material: low-profile shingles, thicker tile or shake, or metal.
- Under the kit
- A waterproof membrane collar around the opening is the first line of defense if water ever gets past the metal.
- Cricket rule
- Unit skylights installed and flashed to the manufacturer’s instructions are the one exception to the IRC’s 30-inch cricket rule (R903.2.2).
- Lifespan tip
- When a roof is replaced, the skylight’s flashing should be replaced with it. Old flashing rarely fits a new roof correctly.
How it’s installed
- A waterproof membrane is installed around the opening before the skylight is set.
- The sill (bottom) flashing goes on first, over the shingles below.
- Step flashing pieces run up each side with the shingle courses.
- The head flashing goes on last and is tucked under the shingles above.
What goes wrong
- Roofing cement used in place of the manufacturer’s flashing kit.
- An old flashing kit reused around a new skylight, or the wrong kit for the roof type.
- Condensation on the glass mistaken for a roof leak (it’s a ventilation and humidity issue).
On every roof replacement we replace the skylights too: a new skylight and a new flashing kit, with no reused materials. Our skylight installs use the manufacturer’s own flashing kit for the roof type, with a waterproof membrane installed around the opening first. See our skylight installation page, and every part of a skylight in Parts of a Skylight, Explained.
Flashing Metals Compared
The metal is as important as the shape. Here is how the common flashing metals compare on a home.
| Metal | Where it’s used | Good to know |
|---|---|---|
| Copper | Chimneys, valleys, headwalls, pipe boots, slate and cedar roofs | Can be soldered into seamless corners and weathers to a brown, then green patina. Copper runoff corrodes aluminum and galvanized steel, so copper valleys should drain into copper gutters. |
| Aluminum | Step flashing, drip edge, valleys and trim on shingle roofs | Light, rust-free and available prefinished in colors. Avoid it where it would be set into mortar or touch wet masonry, and keep it away from copper. |
| Galvanized or painted steel | Valleys, step flashing, drip edge, kick-outs | Stiff and economical. The zinc coating protects it; cut edges and scratches are where it rusts first. |
| Lead and lead-coated copper | Chimney and masonry flashing, pipe sleeves, historic roofs | Very soft, so it forms tightly to brick and stone. |
| Stainless steel | Chimneys, coastal homes, specialty details | Very durable and corrosion resistant; harder to form by hand. |
Copper is our standard flashing metal, from chimney and wall flashing to pipe flashings. When a roof system begins to fail, it usually starts at the rubber pipe boots and the chimney flashing, so those are the parts we build to last.
Part 2 · Valleys
Where two slopes meet, the roof has to carry the water from both.
Roof Valleys
Also called: valley flashing, valley metalA roof valley is the inward-angled seam where two roof slopes meet. Because both slopes drain into it, a valley carries more water than any other part of the roof, which is why it gets extra protection underneath and, on many roofs, a metal lining on top.
PurposeCarries the water from two roof slopes down to the gutter without letting it get under the roofing.
- Under every valley
- A self-adhering waterproof membrane runs down the full length of the valley before anything else goes on.
- Open valley (code)
- IRC R905.2.8.2: an open valley lined with metal must be at least 24 inches wide and made of a corrosion-resistant metal.
- Closed valley (code)
- A closed valley can be lined with one ply of smooth roll roofing at least 36 inches wide, or with a self-adhering polymer-modified bitumen membrane.
- Materials
- Copper, aluminum, galvanized steel or prefinished steel for open valleys. Slate and cedar roofs are traditionally detailed with copper.
The four valley types
| Valley type | What you see | Best for |
|---|---|---|
| Open metal valley | A strip of metal down the center; shingles from both sides are cut back from it. | Roofs that carry a lot of water, and slate, cedar, tile and premium shingle roofs. |
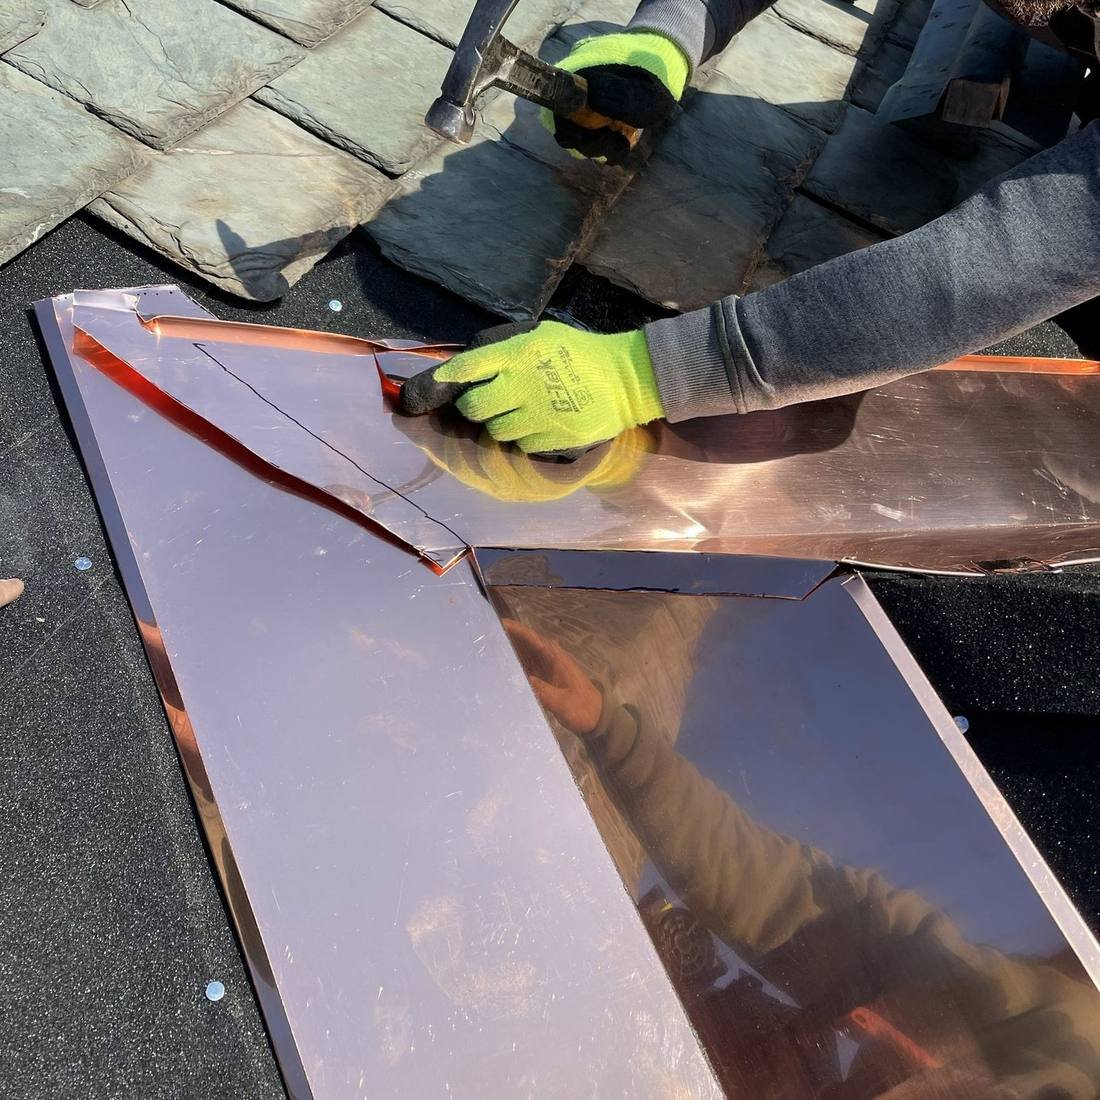
| W-valley | An open metal valley formed with a raised center rib, like a W in cross-section. | Valleys where the two slopes are different sizes or pitches. The rib stops water from one side rushing across and up under the shingles on the other side. |
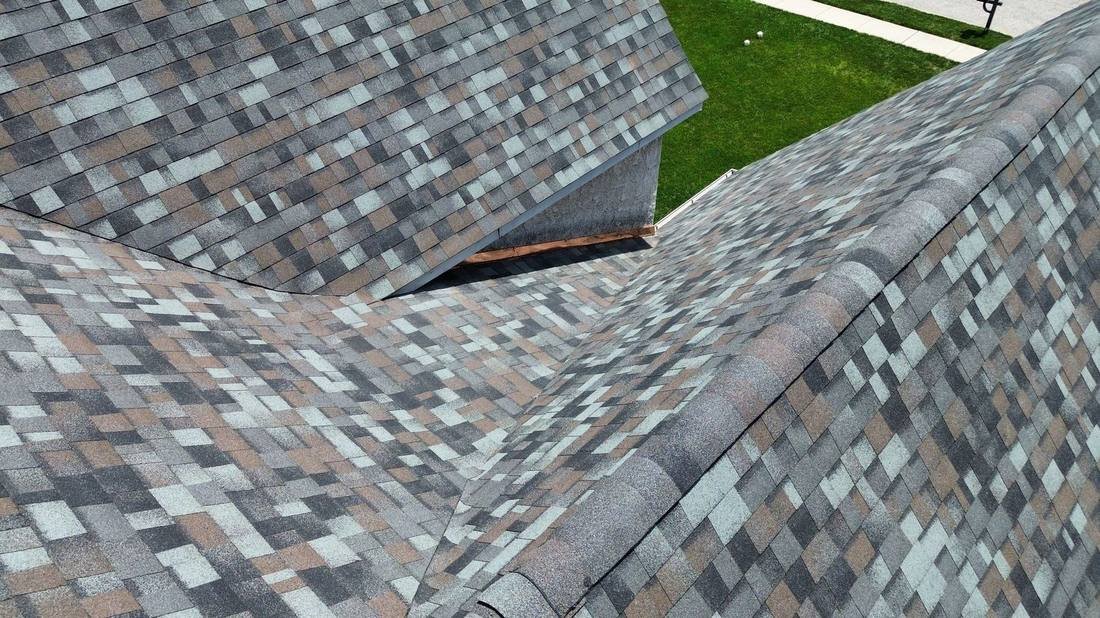
| Closed-cut valley | Shingles from one slope run through the valley; shingles from the other slope are cut in a straight line just short of the center. | The most common valley on architectural shingle roofs. Clean look, no exposed metal. |
| Woven valley | Shingles from both slopes are interlaced across the valley. | Traditional 3-tab shingles. GAF, for example, requires open or closed-cut valleys on its laminated Timberline shingles, because laminated shingles tend to crack when woven. |
Why pitch and length decide the valley
There is no single right valley for every roof. Two things matter most:
- Pitch. A valley always runs flatter than the roof around it. Where two equal slopes meet at a right angle, the valley’s pitch is about 70% of the roof’s (a 6:12 roof has a valley of roughly 4¼:12), so water slows down there. Some valley methods also have slope limits; GAF, for example, accepts its closed-cut “California” valley only on slopes of 4:12 or more.
- Length. A long valley gathers water from more roof, so far more water reaches the bottom than runs past the top. That’s why open valleys are laid out wider at the eave than at the ridge: one common layout starts 6 inches wide at the top and widens at least 1/8 inch per foot of valley toward the eave.
Minimum metal thickness for open valleys
The IRC lists the corrosion-resistant metals allowed for open valley linings in Table R905.2.8.2. The three used most on homes:
- Copper: 16 ounces per square foot
- Aluminum: 0.024 inch
- Galvanized steel: 0.0179 inch (26 gauge)
Why the W Matters
Miguel lays out a hand-formed copper W-valley before it goes on a roof. The valley is one of the most vulnerable parts of any roof, and the raised center of the W divides the water coming off each slope and sends it down the valley instead of across it.
What goes wrong
- No membrane under the valley, so one slipped shingle or nail means a leak.
- Nails driven too close to the center of the valley, where all the water runs.
- A copper valley draining onto aluminum gutters or galvanized metal, which corrodes them.
- Laminated (architectural) shingles woven through a valley, where they can crack and hold water.
We don’t use one default valley. Our team chooses the valley type for each roof based on its pitch and how long its valleys are, and every valley gets ice and water shield underneath first. On slate and premium roofs, our crews hand-form copper W-valleys like the one in the video above.
Part 3 · The deck, the roof edge and the layers
From the wood up, and out to the roof edge that carries your gutters: the parts you never see once the roof is finished.
Roof Decking
Also called: roof sheathing, roof deckRoof decking (also called sheathing) is the layer of plywood, OSB or wood boards fastened to the rafters. Every other layer of the roof is nailed into it, so a roof is only as solid as its deck.
PurposeGives every other layer of the roof a solid surface to nail into and carries the roof’s weight to the rafters.
- Materials
- Plywood or OSB panels on most homes. Older homes often have solid wood plank decking, and some cedar roofs are laid on spaced boards.
- What we look for
- Rot, soft spots, delamination, sagging between rafters and gaps between old boards that are too wide to nail shingles into.
- Why it matters
- Shingle and membrane warranties assume a sound, dry deck. Nails driven into soft wood don’t hold.
Every Deck Gets Inspected
On a full replacement, our crews remove the roof down to the wood so the decking can be checked for rot, soft spots and delamination that old shingles hide. Damaged sections are replaced before any membrane, underlayment or shingle goes on.
See a project where we replaced 11 sheets of decking →What goes wrong
- New shingles laid over soft or rotted decking, which shows up later as dips and nail pops.
- A second layer of shingles over the first, so nobody ever sees the deck.
Every full replacement is torn off to the deck. Our team inspects the wood, updates the homeowner, and replaces any damaged decking before the new system goes on.
Drip Edge
Also called: eave metal, rake edge, drip flashing, D-metal, gutter apronDrip edge is an L- or T-shaped metal strip installed along the eaves and rakes (the bottom and sloped side edges) of a roof. It guides water off the roof edge and into the gutter, so it can’t curl back under the shingles and rot the fascia and the edge of the deck.
PurposeGuides water off the roof edge into the gutter and protects the fascia and the edge of the deck from rot.
- Where it goes
- Along every eave and rake of the roof, at the very edge of the deck, lapping over the top of the fascia board.
- Code
- IRC R905.2.8.5 requires drip edge at the eaves and rakes of shingle roofs.
- Profiles
- Type C (L-style): a simple 90-degree angle. Type D (T-style, “D-metal”): a T-shaped profile that holds water farther from the fascia; the Asphalt Roofing Manufacturers Association prefers it to Type C. Type F (gutter apron): a longer leading edge, useful over existing shingles and on rakes.
- Materials
- Prefinished or painted aluminum, galvanized or painted steel, and copper. Vinyl and plastic versions are meant for non-roofing uses, such as over doors and windows.
- Laps & reach
- Pieces overlap at least 2 inches; the metal extends at least 1/4 inch below the roof sheathing and at least 2 inches back onto the deck, nailed no more than 12 inches apart.
- Layering at the eaves
- The drip edge goes on first, and the ice and water shield or underlayment laps over it, so water running down the roof stays on top of the metal.
- Layering at the rakes
- The underlayment goes on first, and the drip edge goes over it, so wind-driven rain can’t get under the underlayment at the side edges.
How the drip edge and gutter apron hand the water off to the gutter is covered in our gutter guide: gutter apron and drip edge.
What goes wrong
- No drip edge, so water wicks behind the gutter and rots the fascia board and the edge of the deck.
- Underlayment lapped the wrong way at the eave, so water runs behind the metal.
- Bent or corroded old drip edge left in place under a new roof.
Fascia Board
Also called: fascia, eave fascia, fascia trimA fascia board is the long, flat board that runs along the roof edge across the ends of the rafters. It closes off the roof edge, carries the gutters, and gives the drip edge something to lap over.
PurposeCloses off the ends of the rafters, holds the gutters and backs the drip edge along the roof edge.
- Where it is
- Along the eaves at the bottom edge of the roof, just below the drip edge and in front of the soffit. The sloped gable ends have a matching rake board.
- Works with
- The drip edge laps over the top of the fascia so water lands in the gutter, the gutter hangers fasten through it, and the soffit meets it underneath.
- Materials
- Wood (often pine, fir or cedar), cellular PVC or composite trim board, fiber cement trim, and aluminum fascia wrap (also called capping): aluminum coil stock bent on a brake and fitted over the wood.
- Signs of trouble
- Peeling paint, soft or stained wood behind the gutters, gutters pulling away from the house, and gaps where birds or squirrels get into the eaves.
The fascia carries the whole gutter system. See how gutters are hung on it in our gutter guide: gutter hangers.
How it’s installed
- The rafter tails are checked so the fascia can run in a straight, even line.
- The fascia board is fastened across the ends of the rafters.
- If the fascia is wrapped, the aluminum is formed to fit and fastened over sound wood, with joints lapped so they shed water.
- The drip edge goes on along the roof edge, lapping over the top of the fascia, and the gutters are hung on it.
What goes wrong
- Rot behind clogged or overflowing gutters, where water sits against the wood.
- No drip edge, so water wicks behind the gutter and soaks the top of the fascia.
- Aluminum wrap installed over rotted wood, or left open at the ends, which hides rot instead of stopping it.
- Gutters hung on soft fascia that can’t hold their fasteners.
Ice and Water Shield
Also called: ice barrier, leak barrier, self-adhered underlayment, peel-and-stick membraneIce and water shield is a self-adhering, rubberized-asphalt membrane applied directly to the roof deck in the areas most likely to leak. It sticks to the wood, seals around every nail driven through it, and stops water that backs up under the shingles from ice dams or wind-driven rain.
PurposeSeals the deck where water is most likely to back up or collect, so ice dams and wind-driven rain can’t reach the wood.
- Where it goes
- Eaves, valleys, around chimneys, skylights and pipes, along roof-to-wall joints and on low-slope sections.
- Code (eaves)
- Where the local code calls for an ice barrier, IRC R905.1.2 requires it to run from the roof edge to at least 24 inches inside the exterior wall line of the house.
- Roll size & laps
- Rolls are typically 36 inches wide. Grace Ice & Water Shield, for example, calls for side laps of at least 3.5 inches and end laps of at least 6 inches, always shingled so water runs over each lap.
- Temperature
- Standard membranes are installed in fair weather (Grace specifies 40°F and above). Metal and copper roofs need a high-temperature version (see below).
Why 24 inches often means two rows
The 24 inches is measured level, inside the warm wall, not up the slope. Add the roof overhang and the pitch, and on many homes the membrane has to run well past one 36-inch-wide roll. That’s why you often see two rows of ice and water shield at the eaves.
“Ice and water shield” is a brand name that stuck. Manufacturers also call these products leak barriers or self-adhered underlayments; GAF’s versions, for example, are sold as WeatherWatch and StormGuard leak barriers.
What goes wrong
- Installed only at the eaves, with nothing in the valleys or around penetrations.
- Laps installed backwards (upper sheet under the lower one), so water runs into the seam.
- A standard membrane under a metal roof, where heat can make it soften and flow.
Ice and water shield is installed in the most vulnerable areas of every shingle roof we replace: eaves, valleys and roof penetrations. At the eaves it is carried past the warm wall, at least 24 inches inside the exterior wall line in standard installations, and further where pitch, roof design, local code or the manufacturer requires.
Roof Underlayment
Also called: felt paper, tar paper, synthetic underlaymentRoof underlayment is the water-resistant sheet that covers the entire roof deck under the shingles. It is the backup layer: if wind-driven rain or melting snow gets past the shingles, the underlayment sheds it down and off the roof.
PurposeAdds a second water-shedding layer under the shingles across the whole roof deck.
- Felt paper
- Asphalt-saturated felt, sold as No. 15 (ASTM D226 Type I) and the heavier No. 30 (ASTM D226 Type II), in 36-inch-wide rolls. The traditional underlayment, and still standard under slate and cedar.
- Synthetic
- Woven or spun polypropylene or polyester sheets. Lighter and far more tear-resistant than felt, they lie flatter and are safer to walk on. Laps and fastening follow the manufacturer’s printed lines.
- Code laps (felt)
- On shingle roofs sloped 4:12 or steeper, one layer, laid shingle-fashion from the eave, lapped 2 inches horizontally and 4 inches at the ends, with end laps staggered 6 feet apart.
- Low slopes
- From 2:12 up to 4:12, the IRC calls for two layers: a 19-inch starter strip, then 36-inch sheets each lapped 19 inches over the one below.
When felt paper is installed
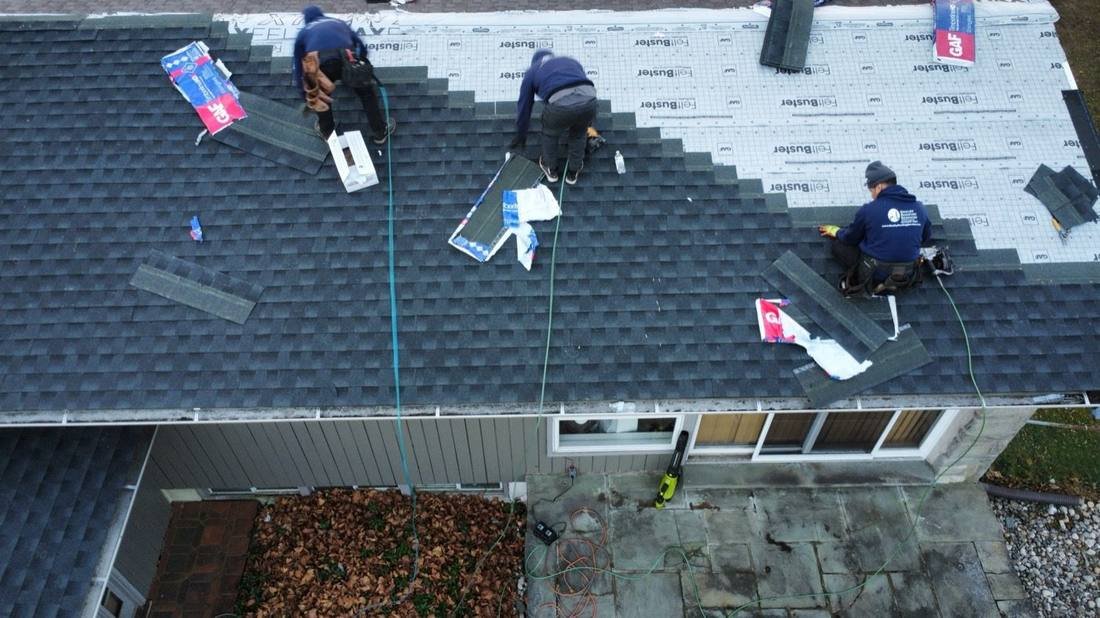
Underlayment goes on right after the drip edge at the eaves and the ice and water shield, starting at the bottom of the roof and working up, so every sheet laps over the one below it. It overlaps the top edge of the ice and water shield and runs up to the ridge, then the drip edge is installed over it along the rakes and the shingles go on.
| Felt paper (No. 15 / No. 30) | Synthetic underlayment | |
|---|---|---|
| Made of | Paper or fiberglass mat saturated with asphalt | Woven or spun polypropylene or polyester |
| Roll width | 36 inches | Varies by product |
| Tear and wind resistance | Tears more easily, can wrinkle when wet | Very tear-resistant and lies flat |
| Walkability | Can be slick when wet | Most have a slip-resistant surface |
| Common uses | Asphalt shingle roofs, slate, cedar shake interlayment, traditional and historic roofs | Asphalt shingle roofs and many metal roofs |
What goes wrong
- Underlayment lapped under the ice and water shield instead of over it.
- Wrinkled or torn felt left in place, which telegraphs through the shingles.
- Underlayment left exposed for longer than the manufacturer allows before shingles go on.
Our standard on shingle roofs is ice and water shield in the leak-prone areas and felt paper over the rest of the deck, overlapped correctly so water always flows over the layers instead of behind them.
Starter Strip
Also called: starter shingles, starter courseA starter strip is the first course of adhesive-backed shingles installed along the eaves and rakes before the main shingles. It gives the first row something to seal to and covers the joints and cutouts in that row, so wind can’t lift the roof edge.
PurposeSeals the roof edges so wind can’t lift the first row of shingles, and covers the gaps in that row.
- Where it goes
- Along the bottom edge (eaves) and the sloped side edges (rakes) of every roof plane.
- Why it matters
- Most shingle blow-offs start at the edges. A sealed starter course is what keeps the perimeter locked down in high wind.
- Material
- Pre-made starter shingles from the shingle manufacturer, with a factory adhesive strip placed where the first course needs it.
What goes wrong
- Upside-down field shingles used as a starter, which puts the adhesive in the wrong place.
- No starter at the rakes, leaving the side edges open to wind.
Starter shingles are installed along both the eaves and the rakes before the main shingles on every shingle roof we install.
Underlayment by Roof Type
There is no single “underlayment.” What goes under the roof depends on the roof covering, the pitch and the heat it will see. Here are the three main underlayment families, then exactly what goes under each roofing system we install.
| Ice & water shield | Felt paper | Synthetic | |
|---|---|---|---|
| What it is | Self-adhering rubberized-asphalt membrane | Asphalt-saturated felt, No. 15 or No. 30 | Woven or spun polypropylene or polyester sheet |
| How it attaches | Peel-and-stick to the deck; seals around nails | Mechanically fastened | Mechanically fastened, per printed pattern |
| Typical roll width | 36 inches | 36 inches | Varies by product |
| Laps | Per manufacturer, e.g. 3.5-in sides, 6-in ends (Grace) | 2-in horizontal, 4-in end laps on 4:12+ shingle roofs (IRC) | Per manufacturer’s printed lap lines |
| Where it’s used | Eaves, valleys, penetrations, walls, low slopes; whole roof under some systems | Field of the roof; slate; cedar shake interlayment | Field of the roof on most shingle and many metal roofs |
Asphalt shingle roofs
- Ice and water shield at the eaves (past the warm wall), in valleys and around chimneys, skylights and pipes
- Synthetic underlayment or felt over the rest of the deck, lapped over the membrane
- Two layers of underlayment on slopes from 2:12 to 4:12
Metal & standing seam roofs
- A high-temperature underlayment or self-adhered membrane, because metal runs hot (Grace Ice & Water Shield HT, for example, is rated to 260°F)
- A slip sheet (rosin paper or a non-asphaltic synthetic) between the panels and any asphalt-based layer, unless the membrane has a built-in non-stick surface, so expanding metal doesn’t bond to it
- Under copper, the Copper Development Association describes pans on rosin-sized building paper over No. 30 felt; some membranes are rated for direct contact with copper (Grace Ultra, 300°F)
Natural & synthetic slate
- Traditionally laid over heavyweight No. 30 felt (ASTM D226 Type II) or an equivalent
- Ice and water shield at the eaves, in valleys and at penetrations
- Copper valleys and flashing, because the slate itself can outlast lesser metals
- Synthetic slate follows its manufacturer’s underlayment requirements
Cedar shakes & shingles
- Shakes get interlayment: an 18-inch-wide strip of No. 30 felt laid over the top of each course, its bottom edge above the shake butts at twice the exposure (Cedar Shake & Shingle Bureau)
- A 36-inch strip of No. 30 felt at the eave line
- Sawn cedar shingles are never interlaid with felt; they need airflow to dry, and some installers add a breathable mesh mat underneath
Spanish tile (clay & concrete)
- The underlayment is the primary waterproof layer; the tile mostly sheds water and protects it from sun
- The IRC allows tile on slopes of 2½:12 and steeper, with a double underlayment from 2½:12 up to 4:12
- Heavy underlayments listed for tile (ASTM D226 Type II, D2626 Type I or D6380 Class M roll roofing)
- Tile goes either on battens (horizontal strips the tiles hang on by their anchor lugs) or directly on the deck. The Tile Roofing Institute’s manual requires battens on slopes steeper than 7:12, makes them optional from 3:12 to 7:12, and calls for counter battens (vertical strips under the battens, for airflow and drainage) below 3:12. Battens need small gaps or risers so water can drain beneath them
- Brava synthetic tile follows Brava’s own instructions, which have the installer decide whether battens are needed for each project
Flat roofs: EPDM & TPO
- No underlayment: the membrane itself is the waterproof layer
- Underneath it: insulation board (commonly polyiso), sometimes a cover board for a harder, smoother surface
- The membrane is fully adhered, mechanically attached or (EPDM) ballasted; EPDM seams are primed and taped, TPO seams are heat-welded
On shingle roofs, our standard is ice and water shield at the eaves, in the valleys and around penetrations, with felt paper over the rest of the deck. On metal, slate and cedar roofs, our crews follow the roofing manufacturer’s underlayment and installation requirements, and every metal roof goes over a high-temperature underlayment or ice and water barrier. Clay and concrete Spanish tile roofs get a full underlayment layer and are installed on battens where the manufacturer and code call for them; Brava synthetic tile is installed to Brava’s instructions, with or without battens as the project requires. Our EPDM and TPO roofs are built over new insulation (from 1/2 inch up to 5 inches thick) after any wet insulation is removed.
Part 4 · The top of the roof
The peak seals the roof and lets the attic breathe.
Ridge Cap
Also called: hip and ridge shingles, cap shinglesRidge cap shingles are the thicker, pre-bent shingles that cover the peak of the roof (the ridge) and the outside corners where two slopes meet (the hips). They seal the highest, most wind-exposed points of the roof and finish its lines.
PurposeSeals and finishes the peaks and hips, the most wind-exposed points of the roof.
- Where it goes
- Along every ridge and hip, and over the ridge vent where there is one.
- Material
- Matching cap shingles made by the shingle manufacturer, sized and creased for ridges. Slate, tile and metal roofs have their own ridge pieces.
- Why not cut shingles?
- Cut-up field shingles are thinner and can crack when bent over the ridge. Purpose-made caps are designed for that spot.
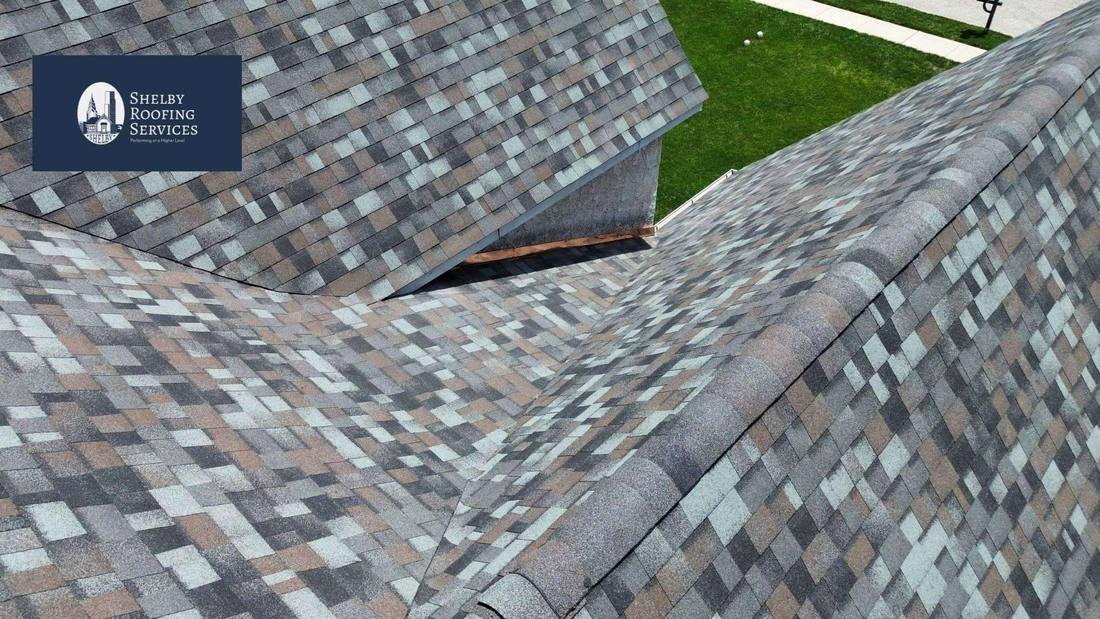
Ridge cap shingles go over the ridge vent and along every peak and hip to complete each shingle roof we install.
Roof Ventilation
Also called: ridge vent, soffit vents, attic ventilationRoof ventilation is the balanced intake-and-exhaust system that lets outside air enter low at the soffits and leave high at the ridge. It keeps the attic close to the outdoor temperature and dry, which protects the shingles, the deck and the house below.
PurposeKeeps the attic dry and close to the outdoor temperature, which protects the shingles and deck and helps prevent ice dams.
- Intake
- Vented soffits or continuous strip vents under the roof overhang let fresh air in at the bottom. Baffles keep insulation from blocking them.
- Exhaust
- A ridge vent is a continuous vent along the peak, covered by ridge cap shingles over a slot cut in the deck. Box vents and gable vents are other exhaust types.
- Code baseline
- IRC R806.2 sets a minimum net free vent area of 1 square foot for every 150 square feet of attic, with reductions allowed when vents are balanced between high and low.
- Golden rule
- Use one type of exhaust per attic. Mixing a ridge vent with box vents or a power fan can short-circuit the airflow.
What goes wrong
- A ridge vent with no soffit intake, so there is nothing to pull air through the attic.
- Insulation stuffed into the soffits, blocking intake.
- Bath fans venting into the attic instead of outside.
- Ridge vent and box vents mixed on the same roof.
Ridge vent is installed along the peak when the attic needs ventilation and the roof design allows it, as part of a balanced system. Learn how ventilation also prevents ice dams.
Questions & Answers
Straight answers to the roof questions homeowners ask us most.
What is a chimney cricket, and do I need one?
A chimney cricket (or saddle) is a small peaked ridge built behind a chimney to split water and debris around it. The International Residential Code (R903.2.2) requires one on the uphill side of any chimney more than 30 inches wide. Chimneys that sit on the ridge don’t need one. Shelby Roofing Services builds crickets wherever the code requires them.
What is the difference between step flashing and counter flashing?
Step flashing is the set of small L-shaped pieces woven into each shingle course along a wall or chimney. Counter flashing is attached to the wall or chimney above it and laps down over the top edge of the step flashing. Together they let the roof and the wall move separately without opening a gap. On chimneys, Shelby Roofing Services cuts the counter flashing into the mortar joints.
Which is better, an open valley or a closed valley?
Both work when they are installed correctly over a waterproof membrane. Open metal valleys, especially W-valleys, move water fastest and are used on slate, cedar, tile and premium roofs. Closed-cut valleys are the most common choice on architectural shingle roofs because they have no exposed metal. The right valley depends on the roof’s pitch and how long the valley is, which is how our team chooses for each roof.
What is a W-valley?
A W-valley is an open metal valley formed with a raised center rib, so it looks like a W in cross-section. The rib keeps water from one roof slope from rushing across the valley and up under the shingles on the other slope.
What is kick-out flashing?
Kick-out flashing is a small angled piece at the bottom of a roof-to-wall joint that turns water away from the wall and into the gutter. The IRC (R903.2.1) requires a diverter where a roof eave meets a sidewall. Without one, water runs behind the siding or stucco. Shelby Roofing Services installs a kick-out wherever a roof edge ends against a wall.
What is a drip edge, and what is its purpose?
A drip edge is an L- or T-shaped metal strip along the eaves and rakes of a roof. Its purpose is to guide water off the roof edge and into the gutter, so it can’t curl back under the shingles and rot the fascia and the edge of the deck. Common profiles are Type C (L-style), Type D (T-style) and Type F (gutter apron).
Is drip edge required on a roof?
Yes. IRC R905.2.8.5 requires drip edge at the eaves and rakes of asphalt shingle roofs. It must lap at least 2 inches, extend at least 1/4 inch below the sheathing and run at least 2 inches back onto the deck. At the eaves the underlayment goes over the drip edge; at the rakes the drip edge goes over the underlayment.
What is a fascia board, and what is it made of?
A fascia board is the long, flat board along the roof edge that covers the ends of the rafters. It closes off the roof edge, carries the gutters and backs the drip edge. Fascia is made of wood, cellular PVC or composite trim, or fiber cement trim, and wood fascia is often covered with aluminum fascia wrap (capping).
What is aluminum fascia wrap?
Aluminum fascia wrap, also called capping, is aluminum coil stock bent to shape and fitted over a wood fascia board so the wood isn’t exposed to weather. It should only go over sound wood, with lapped joints; wrapping rotted fascia hides the damage instead of fixing it.
What is ice and water shield, and where does it go?
Ice and water shield is a self-adhering waterproof membrane applied directly to the roof deck. It goes at the eaves, in valleys, around chimneys, skylights and pipes, and along roof-to-wall joints. Where an ice barrier is required, the IRC (R905.1.2) says it must reach at least 24 inches inside the exterior wall line.
How wide is ice and water shield, and how much should it overlap?
Rolls are typically 36 inches wide. Overlaps follow the manufacturer; Grace Ice & Water Shield, for example, specifies side laps of at least 3.5 inches and end laps of at least 6 inches, always shingled so water runs over each seam.
What is felt paper, and is synthetic underlayment better?
Felt paper is asphalt-saturated felt sold as No. 15 and the heavier No. 30, in 36-inch-wide rolls. Synthetic underlayment is a woven or spun plastic sheet that is lighter, more tear-resistant and lies flatter. Both are accepted under asphalt shingles when installed to the code and the manufacturer’s instructions, and No. 30 felt remains traditional under slate and as interlayment on cedar shakes. Shelby Roofing Services’ standard on shingle roofs is felt paper over the deck, with ice and water shield in the leak-prone areas.
What underlayment goes under a metal roof?
Metal roofs need a high-temperature underlayment or self-adhered membrane, because metal runs hot (Grace Ice & Water Shield HT is rated to 260°F). Many systems also use a slip sheet such as rosin paper so the panels can expand without sticking to the asphalt layer. Shelby Roofing Services follows the metal roofing manufacturer’s underlayment requirements on every metal roof.
Should old flashing be reused when a roof is replaced?
No. Old flashing is often bent, corroded or shaped for the old roof, and it’s the most common place for a new roof to leak. On a full replacement, Shelby Roofing Services removes all flashing, vents and pipe boots and installs new ones. Nothing is reused.
What is a pipe boot, and what does it do?
A pipe boot is the flashing that seals around a plumbing vent pipe where it comes through the roof. Its purpose is to keep rain from running down the outside of the pipe into the attic, while the vent pipe itself carries sewer gases out of the house and lets the drains flow.
Are Spanish tile roofs installed on battens?
Often. Battens are horizontal strips the tiles hang on by their anchor lugs. The Tile Roofing Institute’s installation manual requires them on slopes steeper than 7:12, makes them optional from 3:12 to 7:12, and calls for counter battens below 3:12, always with drainage gaps or risers beneath. Shelby Roofing Services installs clay and concrete tile on battens where the manufacturer and code call for them, and Brava synthetic tile to Brava’s instructions.
How long do pipe boots last?
Rubber pipe boots are exposed to sun and weather and often crack years before the shingles wear out. Lead and copper pipe flashings last much longer, which is why copper is Shelby Roofing Services’ standard pipe flashing. When a roof is replaced, every pipe boot should be replaced with it.
Keep Exploring
Not sure what’s on your roof, or why it leaks? A free inspection shows you, with photos of your own flashing, valleys and vents.

